TL;DR
SECCON CTF 14 Quals ran for 24 hours, from 05:00 (UTC) on December 13, 2025 to 05:00 (UTC) on December 14, 2025.
There were a total of 4 web challenges, created by three authors: satoooon, RyotaK, and Ark.
In particular, all four challenges featured a bot, which made them even more interesting.
All of the challenges were excellent, and since some of them were quite difficult, I wrote up solutions for the four problems below.
- broken-challenge (54 solves)
- dummyhole (15 solves)
- framed-xss (7 solves)
- impossible-leak (1 solve)
Enjoy!
broken-challenge
TL;DR
This challenge leverages HTTP/2 Signed HTTP Exchange (SXG) to achieve cross-origin code execution. By exploiting the way Chromium handles SXG, we can execute JavaScript in the context of a target origin.
Overview
The provided express app only has a few routes: one allows us to submit an url for the bot to visit, and - rather uncommon - one that exposes a private key:
index.js
1 | import express from "express"; |
Checking out the Dockerfile, we see that this certificate is added to the NSS database:
1 | certutil -A -d "sql:/home/pptruser/.pki/nssdb" -n "seccon" -t "CT,c,c" -i ./cert.crt |
T means the certificate is trusted as a certificate authority for SSL server authentication.
That means, we can issue certificates for any domain.
From conf.js, it also becomes clear that the goal is to exfiltrate a (non-httpOnly) cookie from the domain hack.the.planet.seccon:
1 | await context.setCookie({ |
Solution
The first question that arises is how to achieve code execution on a domain that does not use a public suffix.
This is where the core difficulty of the challenge lies.
Since we are provided with a private key, which can be used to sign end-entity certificates, it is reasonable to look for ways to leverage this.
By searching for terms such as “web private key universal XSS”, one can eventually come across this Black Hat talk that discusses cross-origin web attacks enabled by SXG.
TL;DR: We can use SXG to execute code under the target origin, if we are able to obtain a valid certificate for the corresponding domain.
SXG
SXG is a content delivery mechanism that allows a browser to verify the origin and integrity of a resource independently of the way it is delivered.
With SXG, publishers can safely make their content portable, meaning it can be redistributed by third parties while preserving content integrity and correct attribution.
We can exploit this mechanism to execute code on an origin different from the one the client is visiting.
That is, if the user agent supports SXG, it will allow us to serve an SXG containing content to be executed in the context of the target origin.
Solver
I will use the tools gen-signedexchange and gen-certurl from https://github.com/WICG/webpackage to generate the SXG and CBOR files.
Here is the step-by-step process (replace <domain> with your server domain):
1 |
|
Create the index.html with our payload:
1 | <script> |
Create the SXG:
1 | gen-signedexchange \\ |
Generate server certificate:
1 | domain="<domain>" |
Flask app for serving the SXG and CBOR files:
1 | from flask import Flask, send_file |
If we now submit the url, we will see requests to our server for the SXG and CBOR files, and the flag exfiltrated.
FLAG : SECCON{congratz_you_hacked_the_planet_521ce0597cdcd1e3}
dummyhole
TL;DR
This challenge chains multiple vulnerabilities to achieve XSS. First, bypass MIME type validation by uploading a JSON file as image/png+json. We then use CSPT (Client-Side Path Traversal) in the <POST_ID> parameter to load our uploaded JSON and control image_url. By setting image_url: ".attacker.com", it gets concatenated with location.origin to become something like https://web.attacker.com, creating an iframe pointing to our controlled domain. From there, we trigger a CSRF logout that redirects with two parameters: <FALLBACK_URL> (containing our XSS payload that feeds into location.href) and <POST_ID> (to block the navigation flow and ensure our payload executes).
Overview
Beyond login and registration, the application allows us to create posts where we have full control over the title, description, and uploaded file.
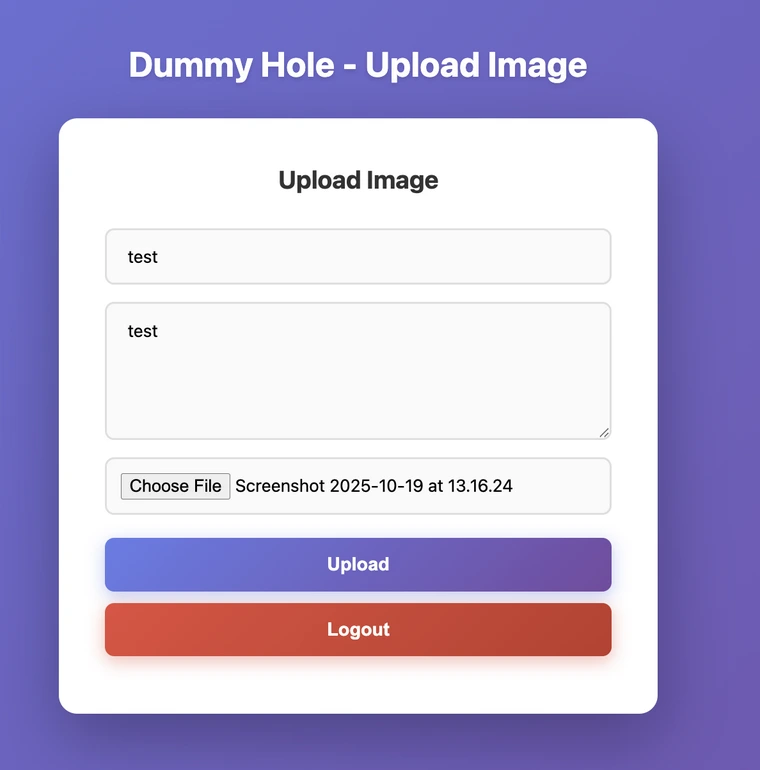
These posts can then be accessed and rendered by navigating to their post ID.
After logging in, the bot visits the reported post. The goal is to achieve XSS and leak the flag
1 | import puppeteer from "puppeteer"; |
Solution
Client-Side Path Traversal
In public/post.html, there’s a straightforward client-side path traversal in the postId parameter. The import requires the file to have a JSON MIME type due to the import assertion with: { type: "json" }.
1 | <script type="module"> |

MIME Type bypass
In the server.js file (upload route), We have the following check where the mimetype has to start with either image/png or image/jpeg
1 | if ( |
Searching for content-type suffixes, we find RFC 6839
-> RFC 6839 - Additional Media Type Structured Syntax Suffixes https://www.rfc-editor.org/rfc/rfc6839.html#section-3.1
Section 3.1 specifically covers the +json structured syntax suffix, According to it the suffix “+json” MAY be used with any media type whose representation follows that established for “application/json”. This means image/png+json is technically a valid MIME type that indicates the content follows JSON structure.
Let’s try that out by uploading the following
1 | ------WebKitFormBoundarydk5AxJ9ubBQNVKDd |
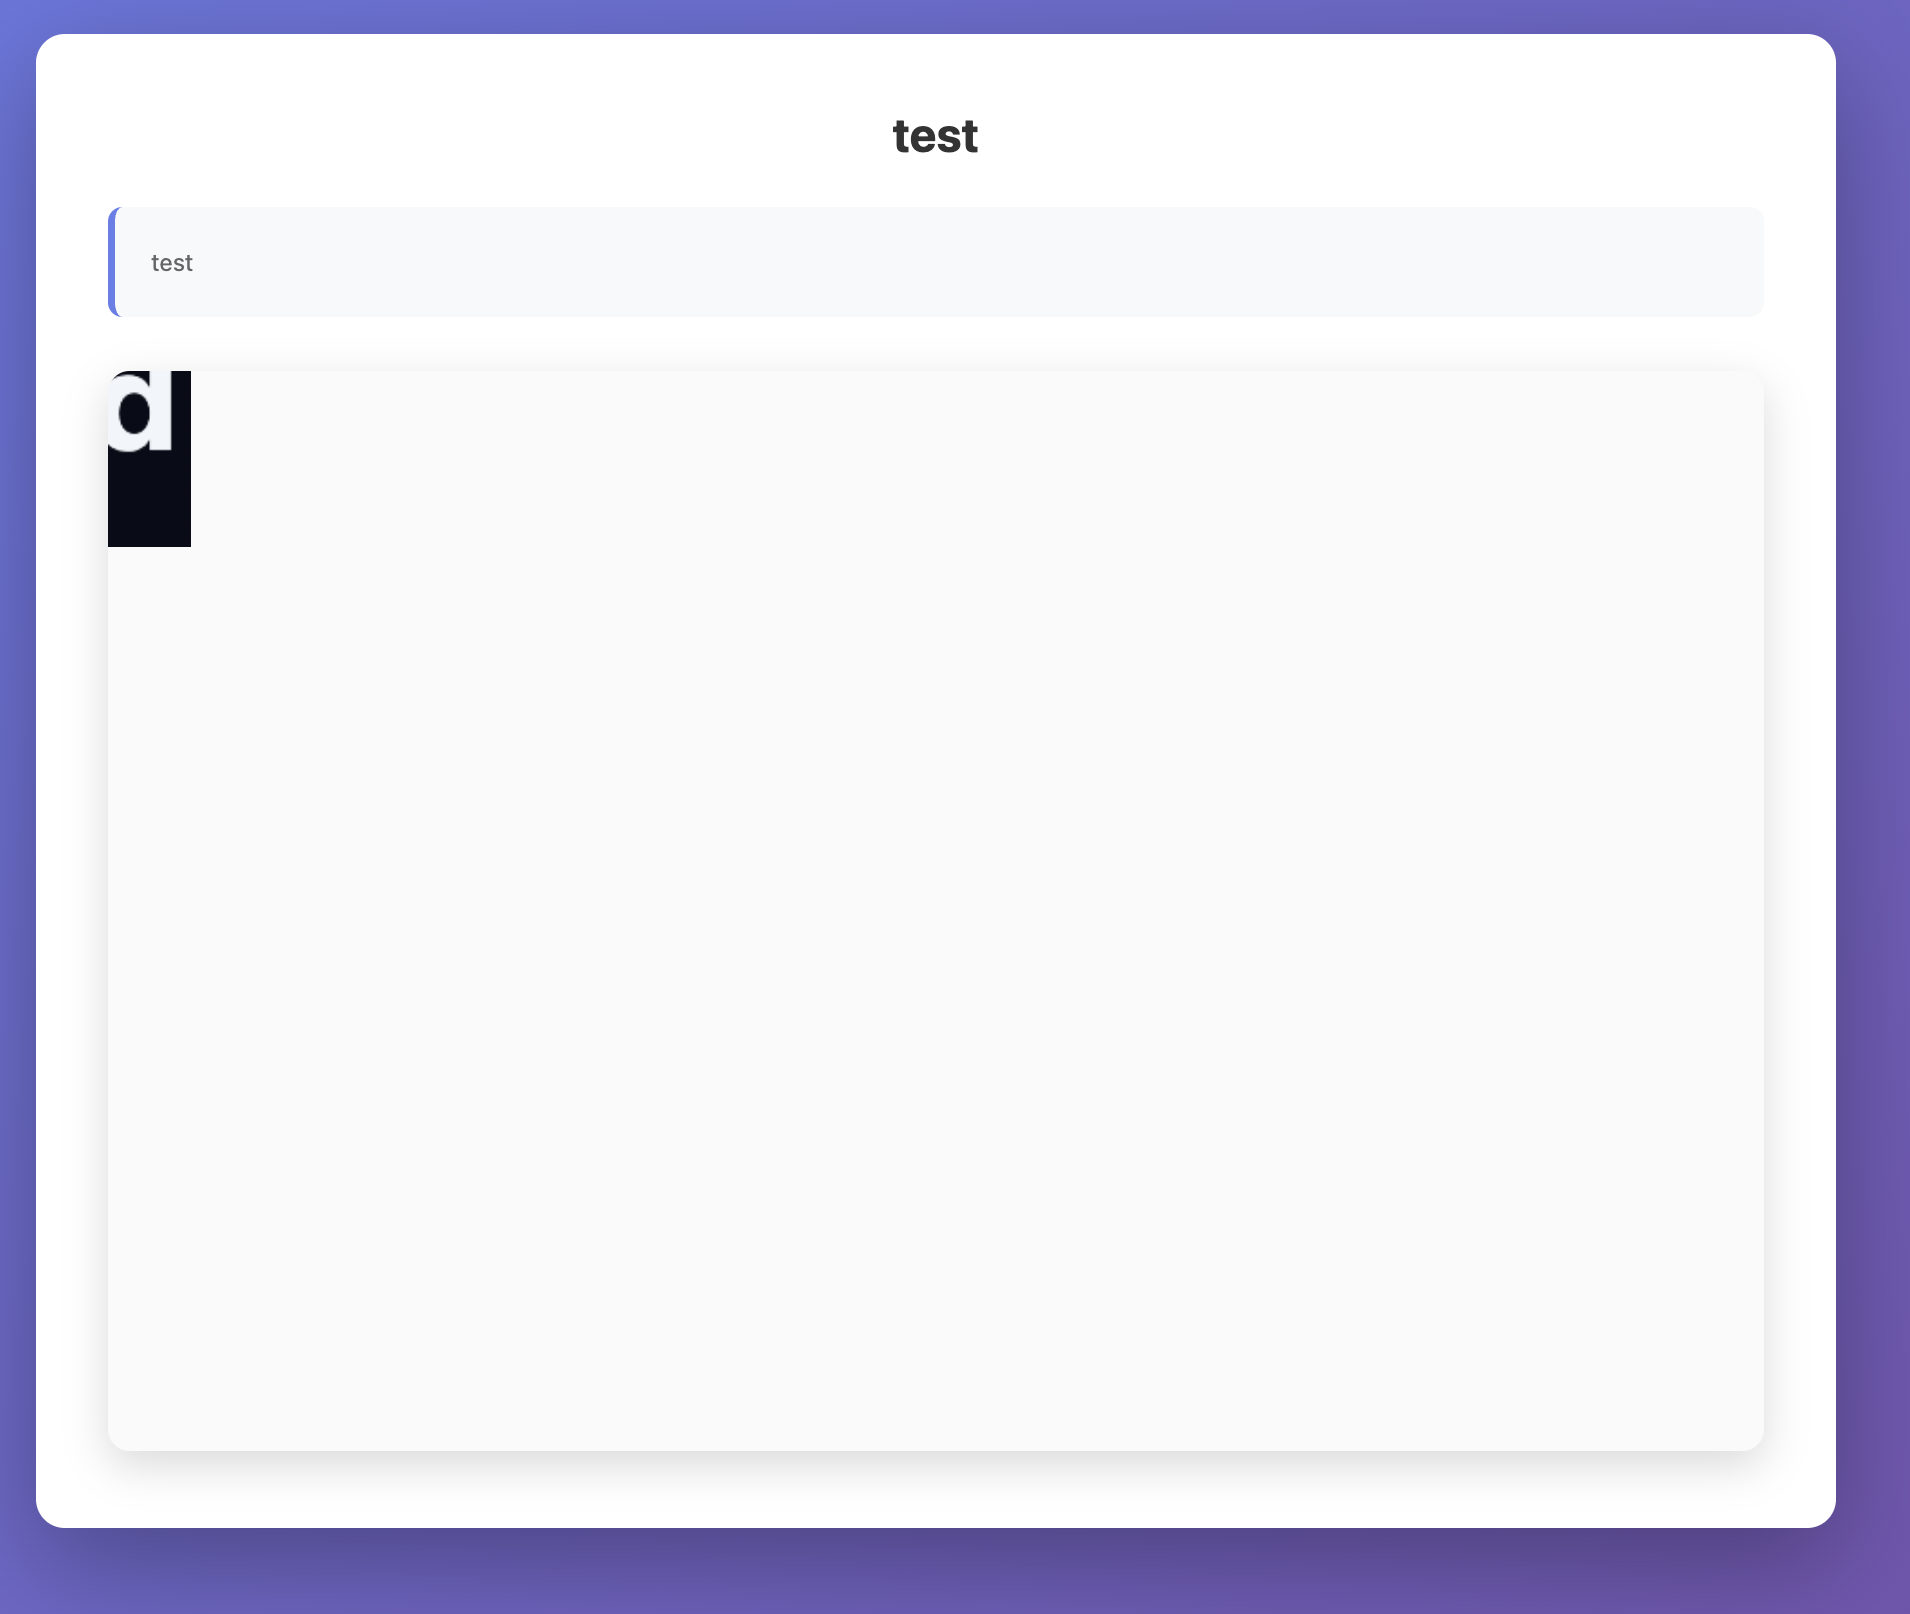
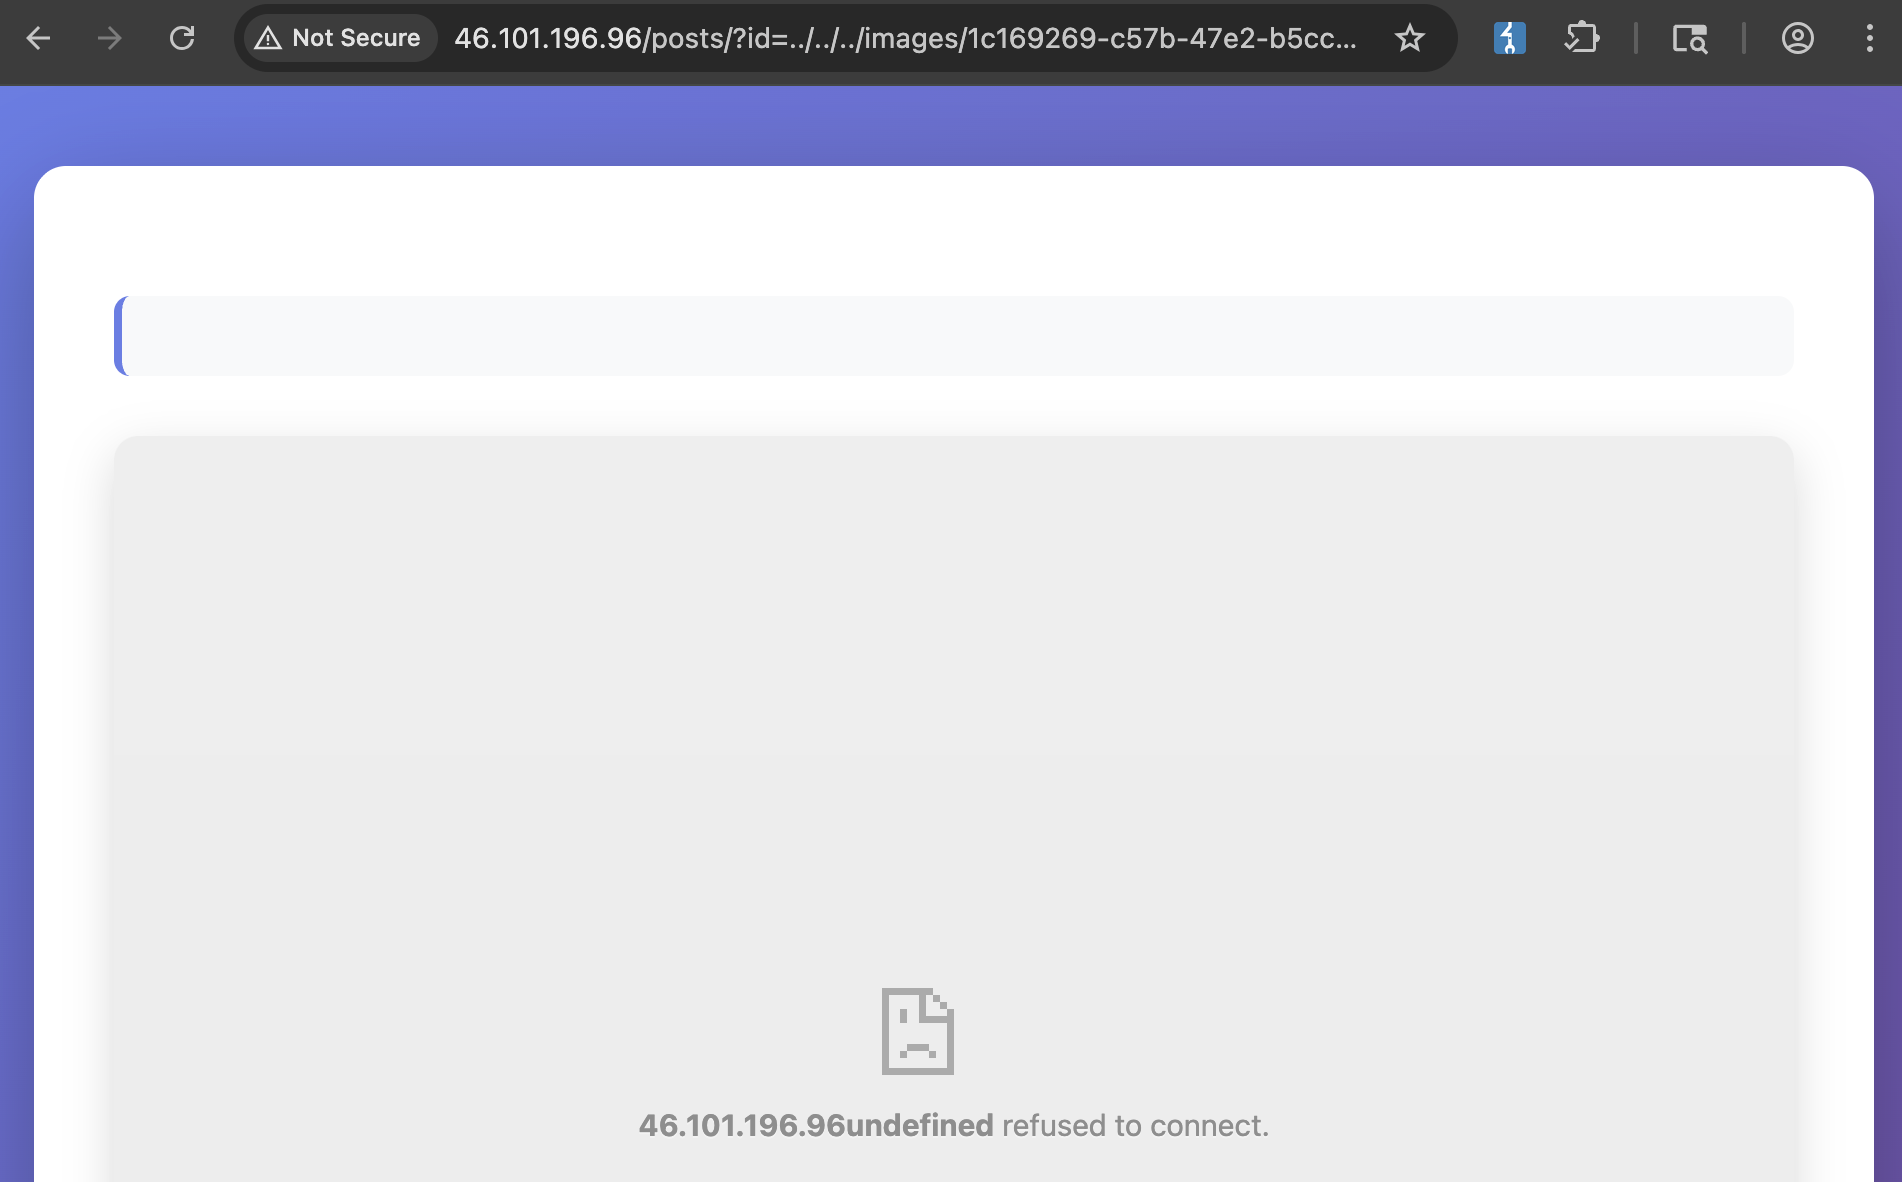
Using the Client-Side Path traversal from the first section, we can point to the uploaded file /posts/?id=../../../images/1c169269-c57b-47e2-b5cc-891efe66cb07. We can see a different response from earlier.
Let’s have a look at the client side code snippet again.
1 | document.getElementById("title").textContent = postData.default.title; |
The code constructs the iframe’s src by concatenating location.origin with our controlled image_url . By setting image_url to .attacker.com, the final imageUrl will be https://web.attacker.com - treating location.origin as a subdomain under our domain.
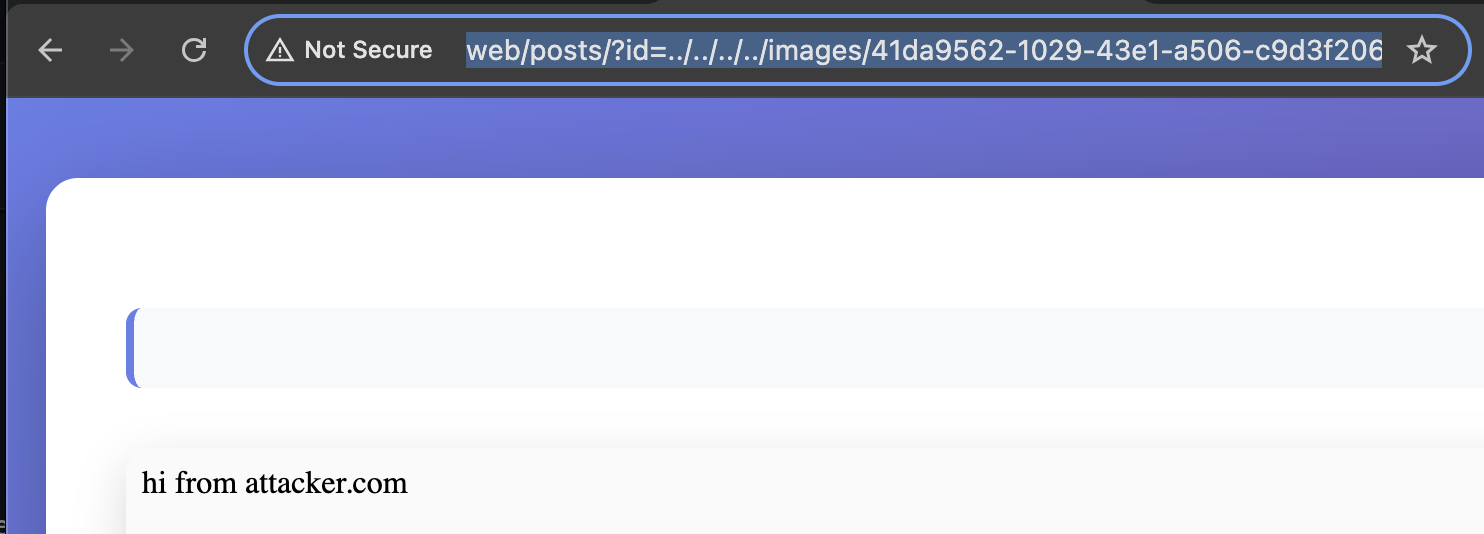
We can upload the following file and check the response.
1 | ------WebKitFormBoundarydk5AxJ9ubBQNVKDd |
We can check the response via http://web/posts/?id=../../../../images/<id> and we can see we were able to render the iframe pointing to our subdomain.
Achieving XSS
The final part of this challenge is the following snippet in the logout.
1 | app.post("/logout", requireAuth, (req, res) => { |
We have a straightforward XSS at first sight, but we will never reach the sink as it will always redirect to /posts/?id=whatever
1 | <script> |
The goal is to somehow stop the redirect or delay it. One solution is mentioned in the following cctb research:
1 | Specifically, in a Client-Side redirect, @kire_devs_hacks mentioned in Discord that Chrome’s Dangling Markup protection detects < together with \n or \t in a URL and will block the request, including navigations. The following will fail to redirect: |
With that in mind, we can write the following, we can save it as pwn.html
1 | <!DOCTYPE html> |
One minor issue remains: the iframe is created with the credentialless attribute, which prevents it from sending cookies. We can bypass this by using window.open('/pwn.html') to open our CSRF in a top-level tab.
1 |
|
What remains now, is to submit ../../../images/<id> to the bot and get the flag
1 | [28/Dec/2025 16:46:12] "GET /pwn.html HTTP/1.1" 200 - |
FLAG : SECCON{why_c4nt_we_eat_the_d0nut_h0le}
framed-xss
TL;DR
This challenge involves bypassing Chrome’s HTTP Cache Partitioning to achieve XSS.
While Chrome uses a _cn (cross-site) prefix in cache keys to isolate resources loaded across sites, we can strip this prefix by forcing a null initiator. Because Puppeteer’s initial goto runs with a null initiator, ensure the cache key not include the _cn prefix and use history.back to preserve the null-initiator state.
Overview
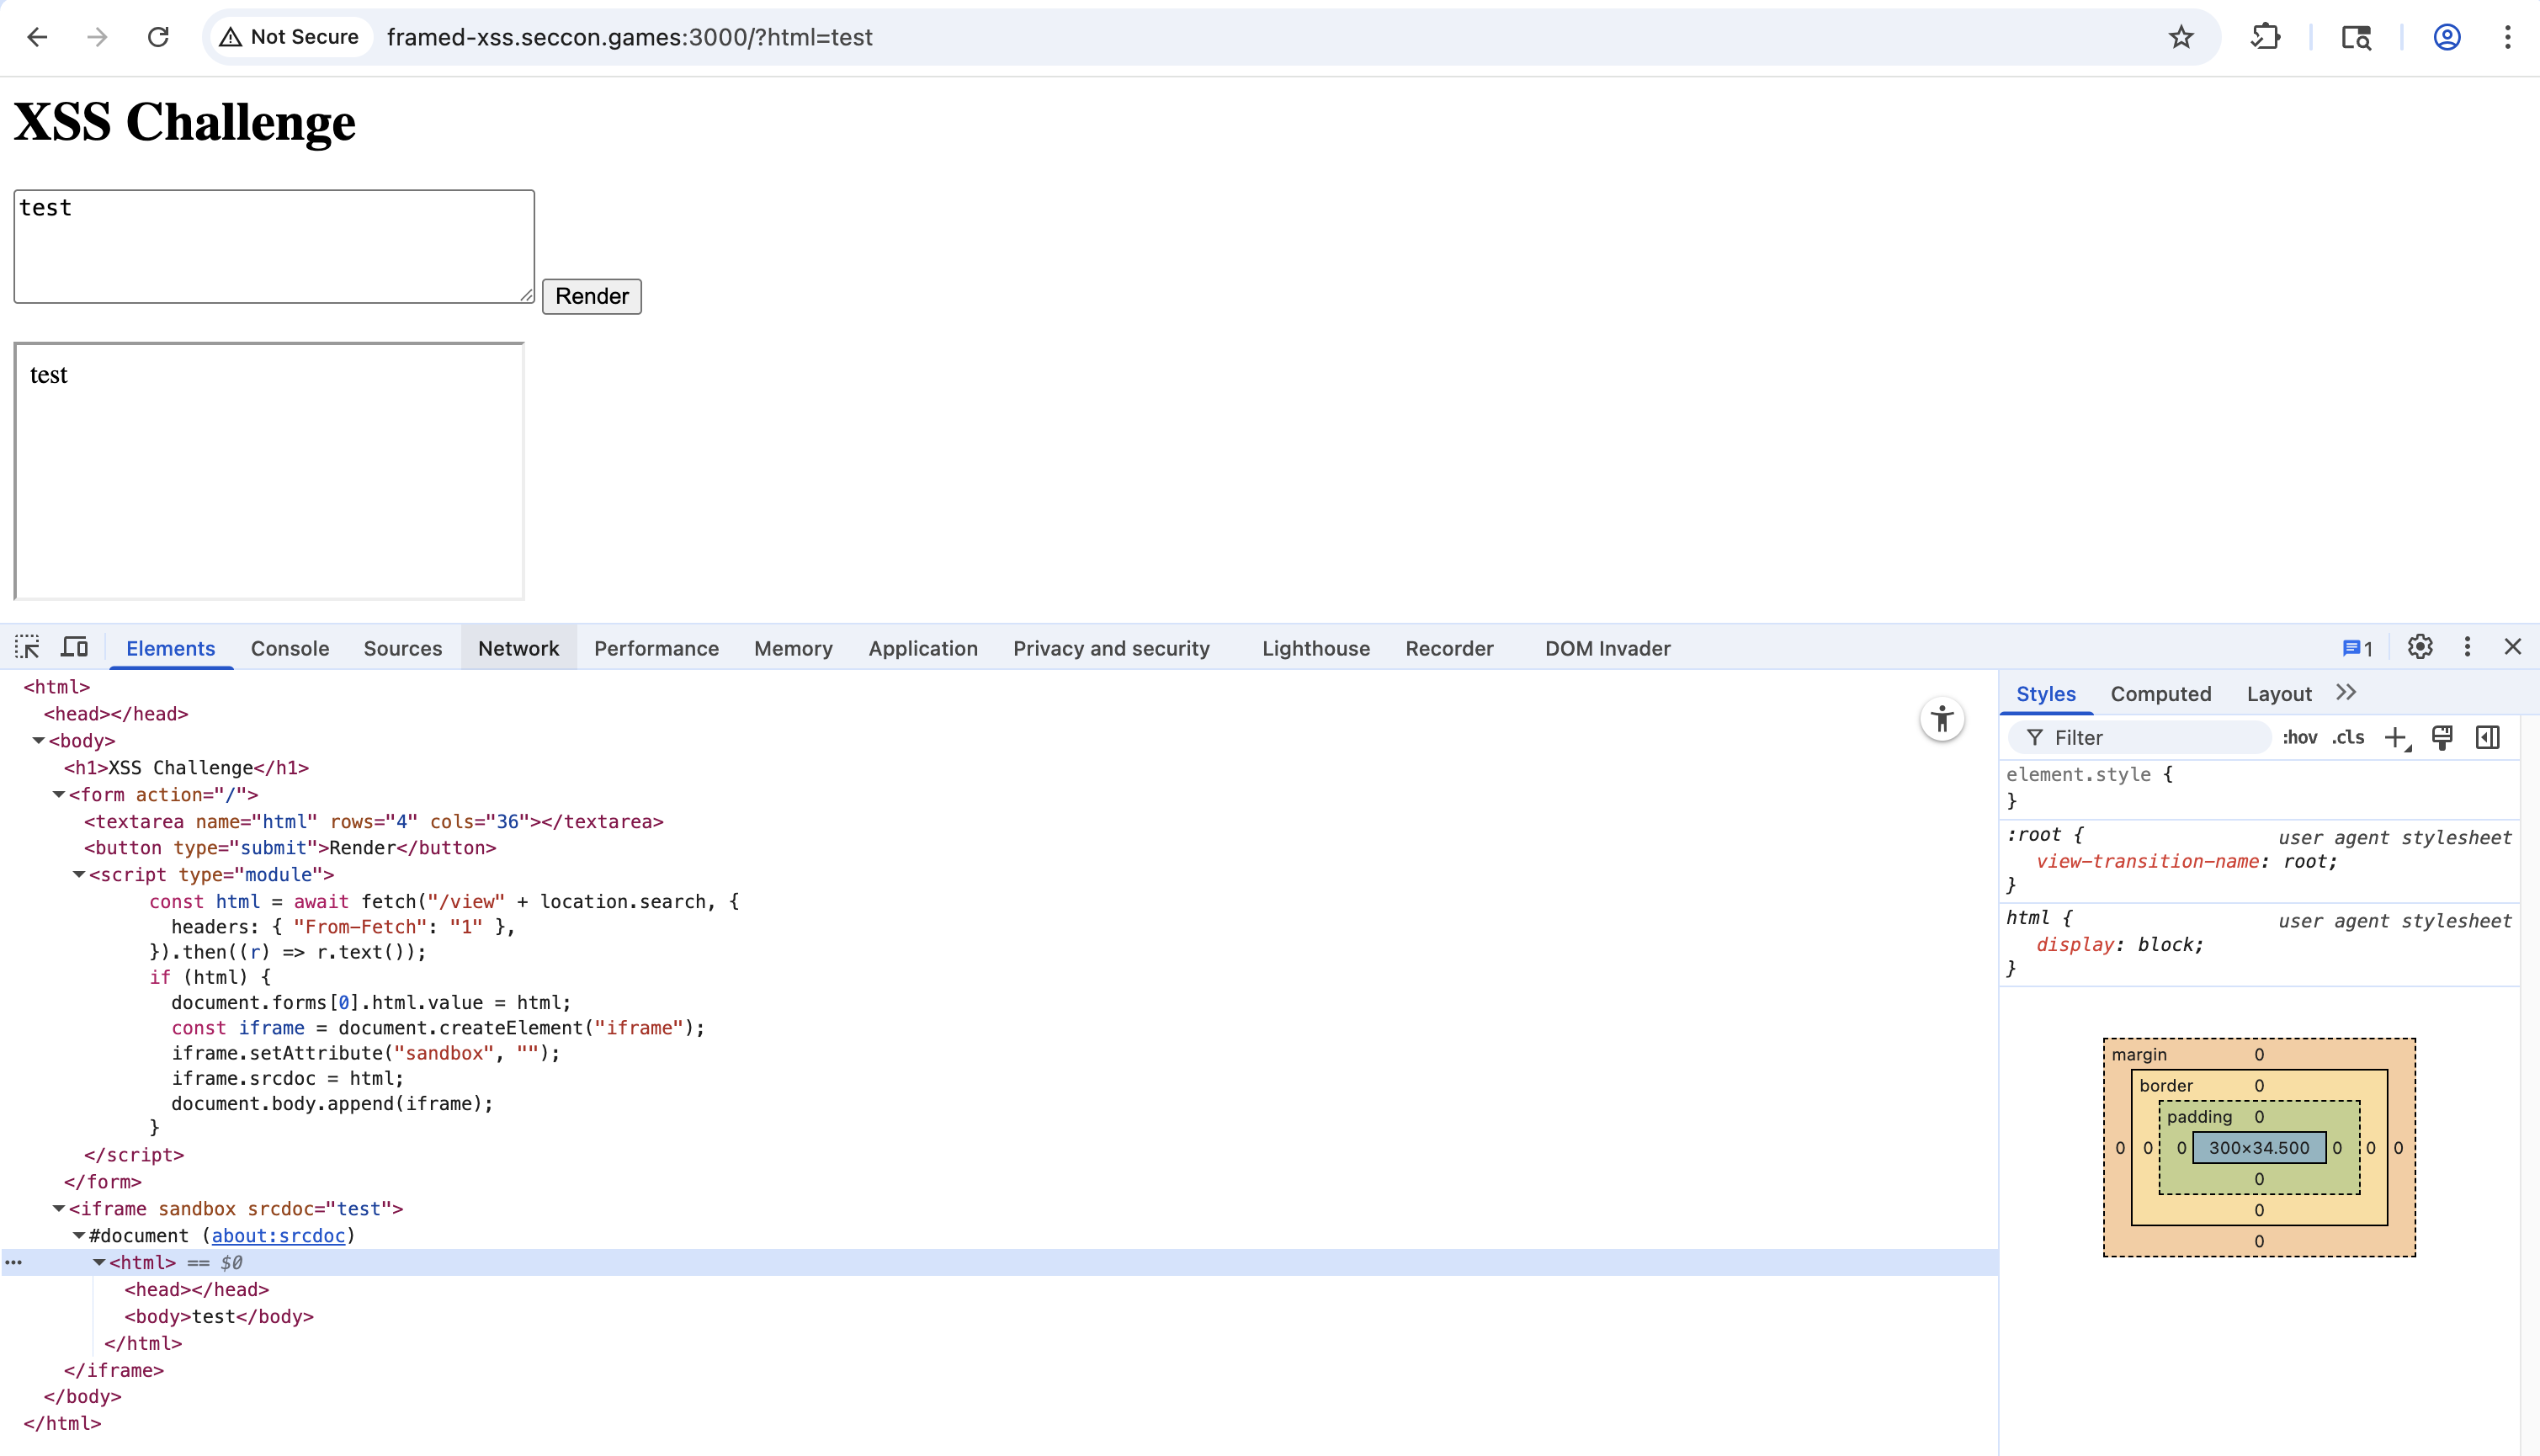
app.py
1 | from flask import Flask, request |
The application returns a page with a module script. The script fetch /view with the same query string via fetch and it can include a custom From-Fetch header. It then renders the returned HTML inside a sandboxed iframe.
conf.js
1 | import puppeteer from "puppeteer"; |
The bot stores the flag in the cookie and then visits the URL. This could be typical XSS challenge.
Solution
HTTP Cache Partitioning
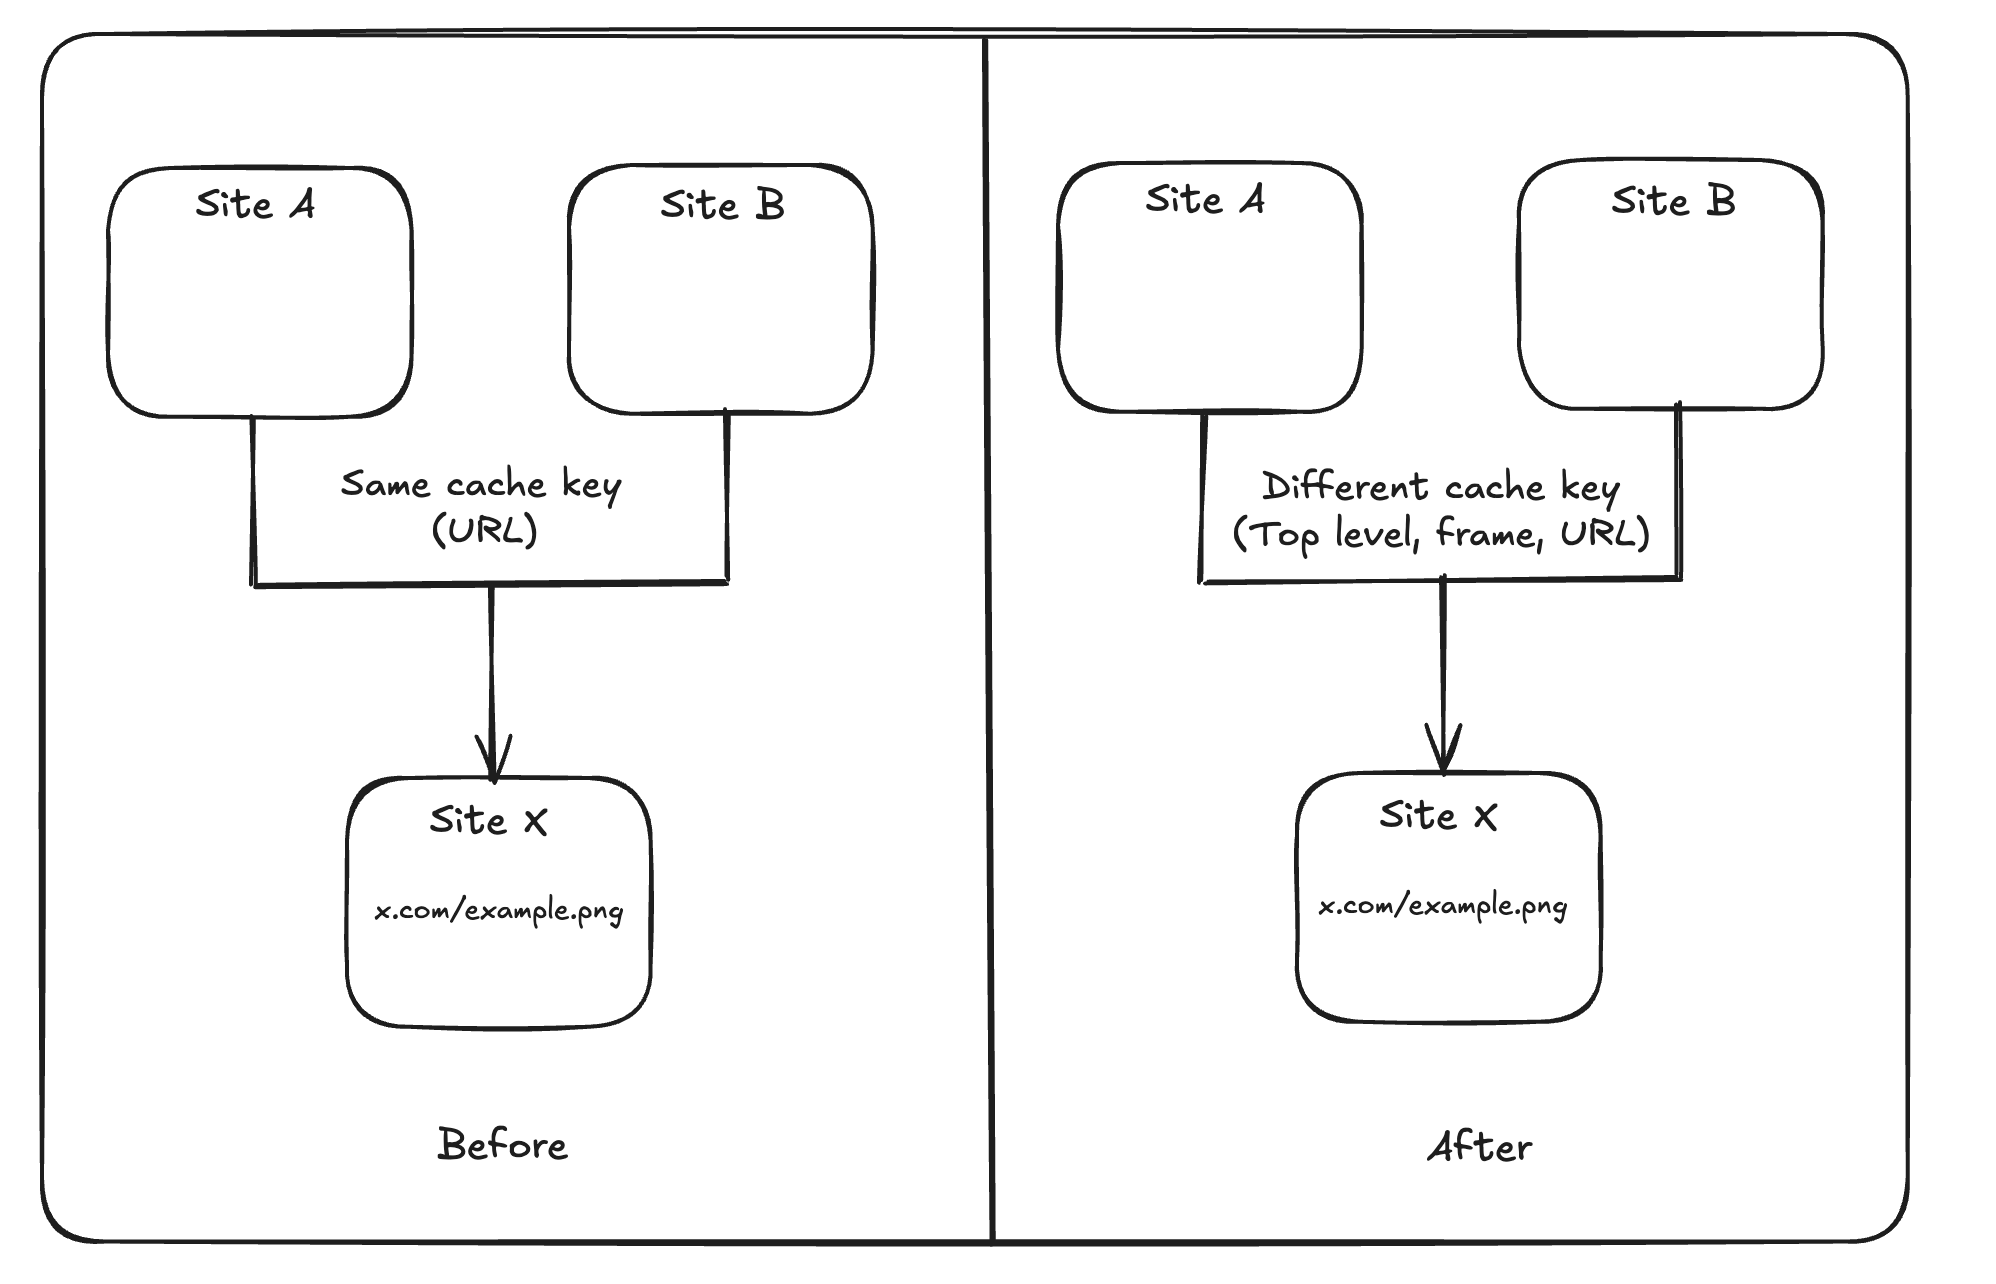
HTTP cache partitioning was publicly announced in 2020 and shipped with Chrome 86. Instead of caching purely by URL, Chrome keys HTTP-cache entries by (Network Isolation Key, URL). The Network Isolation Key is composed of the top-level site and the current-frame site. This has a measured cost (higher miss rate and slightly more network bytes).
Read more: https://developer.chrome.com/blog/http-cache-partitioning
Mitigation
So, is it enough to prevent cross-site leaks or other attacks?
Not always, Chrome engineers also discuss it in this conversation.
Chrome’s HTTP cache keying scheme will be updated to include an “is-cross-site-main-frame-navigation” boolean to mitigate cross-site leak attacks involving top-level navigation. Specifically, this will prevent cross-site attacks in which an attacker can initiate a top-level navigation to a given page and then navigate to a resource known to be loaded by the page in order to infer sensitive information via load timing. This change also improves privacy by preventing a malicious site from using navigations to infer whether a user has visited a given site previously.
So the “triple-key” is not sufficient for some cross-site leak scenarios because, for a navigation, the top-level and frame sites are derived from the destination you navigate to (so they don’t reflect who initiated the navigation).
And the solution is adding _cn to the cache key prefix, creating separate partitions. You can refer to this slide for a more detailed explanation.
1 | std::string_view is_cross_site_main_frame_navigation_prefix; |
Bypass
However, is_cross_site_main_frame_navigation_prefix is only triggered when the initiator is cross-site.
To bypass this and strip the _cn prefix, the request initiator must be null. Unfortunately, we cannot force a null initiator ourselves, but luckily Puppeteer can do this using the goto method. This technique was documented by icefonts in this gist.
1 | // Create a SiteForCookies object from the initiator so that we can reuse |
Then use history.back() to return to the initial session that was created by Puppeteer’s first goto. That history entry retains the navigation context (including null initiator), so the subsequent navigation/redirect is evaluated with a null initiator and the _cn prefix logic doesn’t trigger.
Initial navigation vs. history.back() relationship
Normally, if evil.com navigates you to victim.com, the navigation initiator is evil.com. Chrome sees this, identifies it as cross-site, and applies the _cn cache prefix.
However, Puppeteer starts the session with page.goto(), which results in an initial navigation context where the initiator is null. By navigating away to a blob: URL and then calling history.back(), you are returning the browser to the state of that initial navigation.
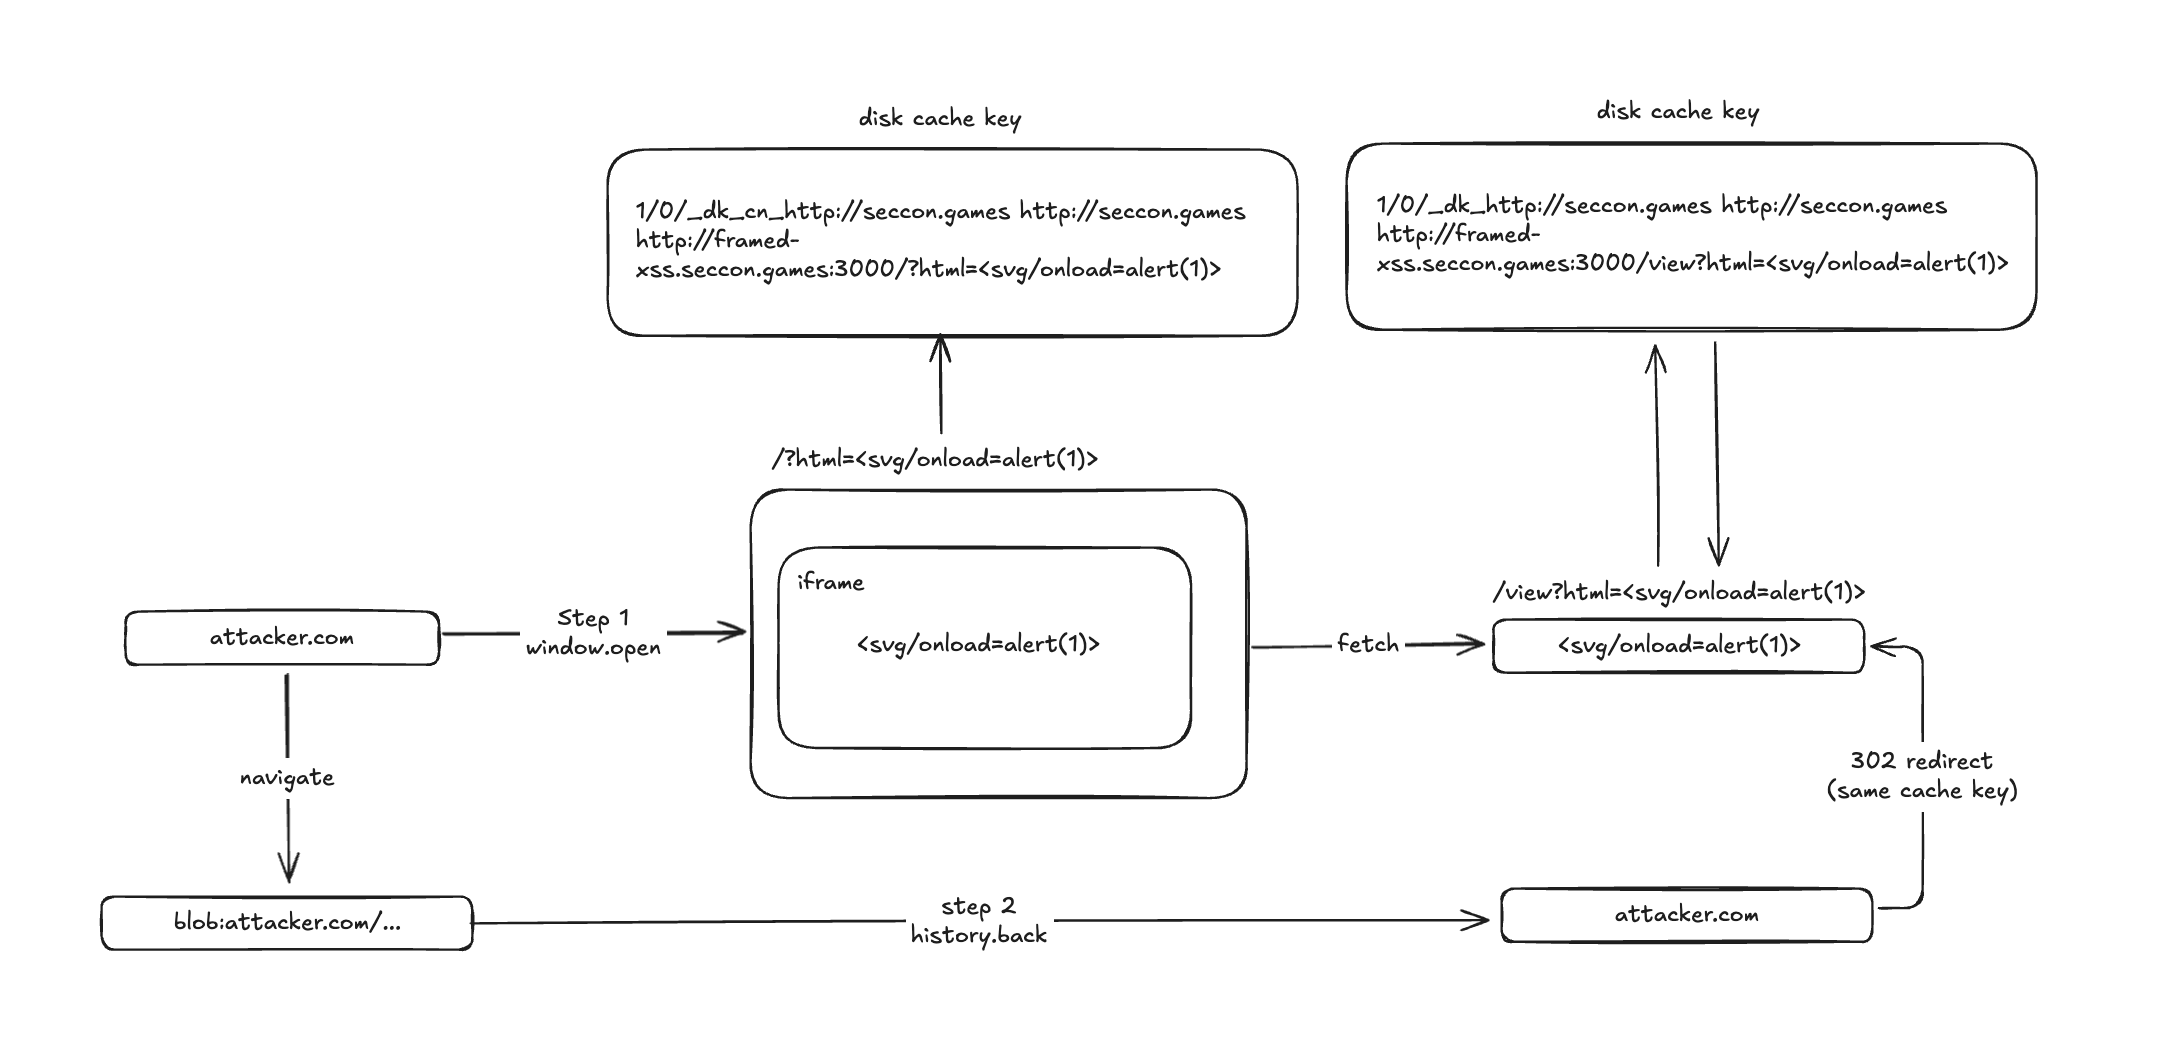
So the attack flow is:
- Bot opens URL via Puppeteer
goto(initiator = null). - The attacker opens a popup with xss payload.
- Attacker navigates to a
blob:URL that callshistory.back(). - From the restored entry, attacker redirects to
/viewwhile initiator = null is preserved.
With initiator = null:
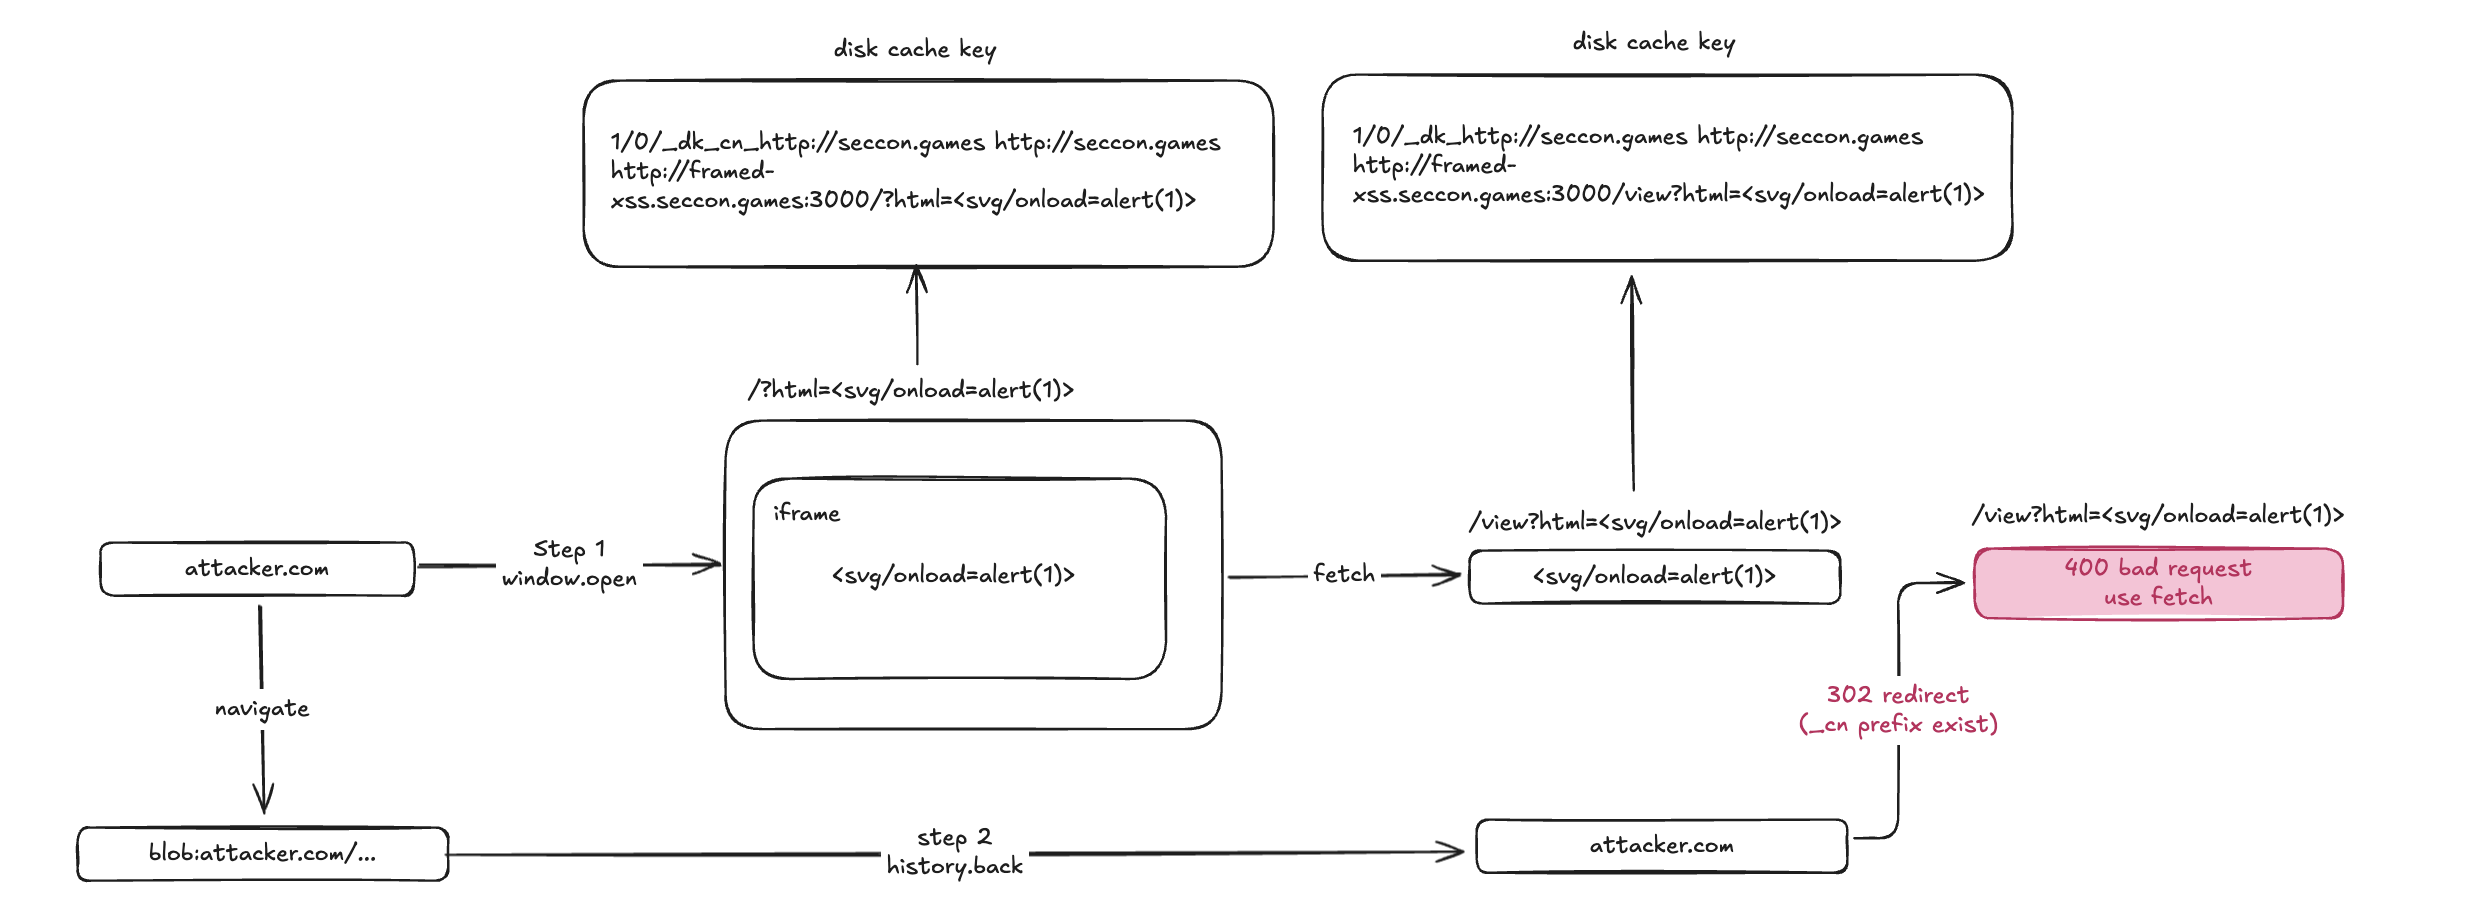
Without initiator = null:
Solver
1 | #!/usr/bin/env python3 |

FLAG : SECCON{New_fe4tur3,n3w_bypa55}
impossible-leak
TL;DR
This challenge was a one-solve web problem and was arguably the hardest among the web challenges.
To solve it, one had to leverage XS-Leaks techniques, and there were multiple viable approaches.
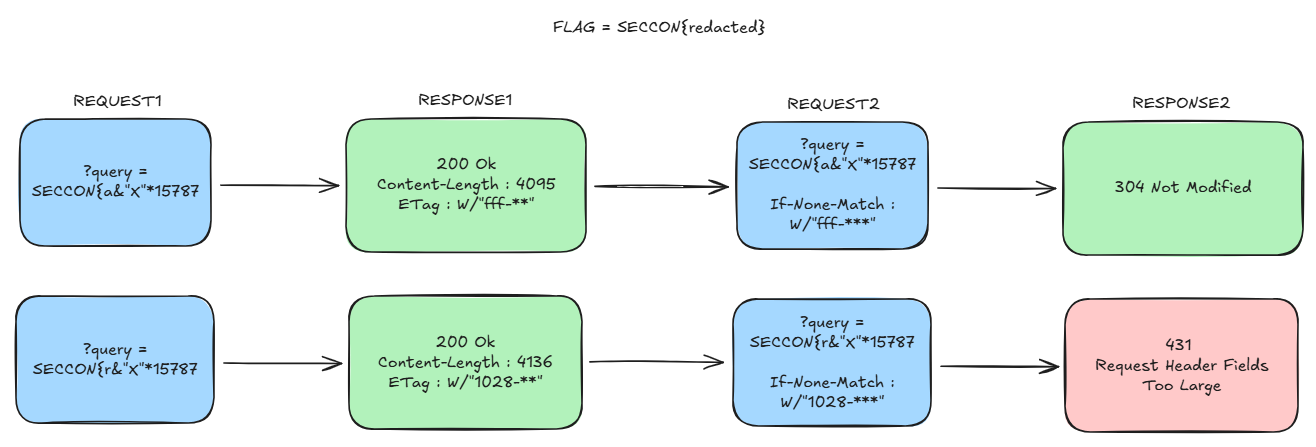
The solution proposed by the challenge author (@Ark) was a cross-site ETag length leak. The key observation is that the ETag header length changes as the target file size increases. Using this, the attack intentionally triggered a 431 (Request Header Fields Too Large) error when the correct FLAG prefix/guess caused the response to grow. Then, it used the fact that when a 431 occurs, history.length does not increase, treating this as an oracle to exfiltrate the FLAG one character at a time.
https://blog.arkark.dev/2025/12/26/etag-length-leak
In contrast, the only solver (@parrot409) presented an alternative approach: “XS-Leaks using in-memory disk cache.” This method relies on the fact that, in bot or incognito environments, the “in-memory disk cache” is much smaller than the normal on-disk disk cache.
The exploit first forcibly caches several resources to groom the cache, then repeatedly visits a page that performs a search for a specific byte value of the FLAG and checks whether the subsequent request is cached. If the guessed byte matches the FLAG, the response body becomes longer, exceeding the cache capacity; as a result, the next request is not cached. By exploiting these cache-behavior differences, the attacker can infer the FLAG.
https://gist.github.com/parrot409/e3b546d3b76e9f9044d22456e4cc8622
Overview
The server is a very simple note application.
1 | import express from "express"; |
A GET request to the / endpoint allows you to search for notes that contain a given query value via a query parameter.
A POST request to the /new endpoint allows you to create a note of up to 1024 bytes.
The template file is as follows:
1 | <!DOCTYPE html> |
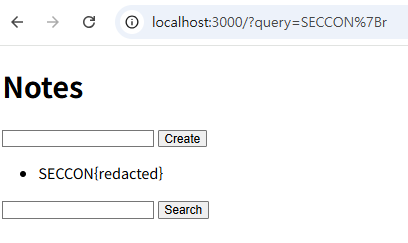
When searching for a value that matches the FLAG (assuming SECCON{redacted} is the FLAG):
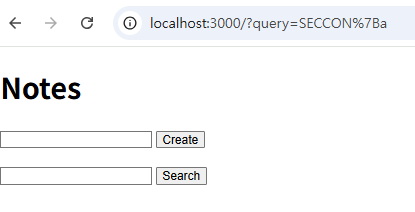
When searching for a value that does not match the FLAG:
The bot code is as follows:
1 | import puppeteer from "puppeteer"; |
Solution
The note content is safely escaped, so there is no HTML injection vector. Also, in the bot code, it waits for 60 seconds.
Therefore, to solve this challenge, you must approach it using an XS-Leaks technique.
First, you need to find an oracle that exhibits a behavioral difference between searching for the correct FLAG value and searching for an incorrect value. The only obvious difference I could observe was that the Content-Length becomes slightly longer when the FLAG appears.
However, this is exactly where the ETag Length XS-Leaks technique can be applied.
ETag Length XS-Leaks
ETag is a byte-string identifier designed to represent an identifiable version of a resource representation in HTTP caching and synchronization mechanisms. In other words, the server assigns a specific ID to the resource representation at a given point in time and delivers it to the client via the ETag header. The client can then send that ID back to the server using headers such as If-None-Match to determine whether the resource has been modified.
The algorithm used to generate the ID value placed in an ETag can vary by server. However, there is a general requirement that it must be non-inferable by the client and opaque.
In this challenge, the Node.js framework used by the server generates ETags according to the algorithm implemented in jshttp/etag.
https://github.com/jshttp/etag/blob/v1.8.1/index.js#L126-L131
1 | function stattag(stat) { |
1 | W / "stat.size(16) - stat.mtime.getTime(16)"; |
stat.size is determined by the Content-Length, and stat.mtime.getTime changes based on the file’s modification time—that is, the time at which a new ETag is generated.
The key point here is stat.size. Whenever the Content-Length changes, the stat.size value changes as well.
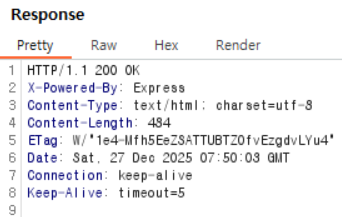
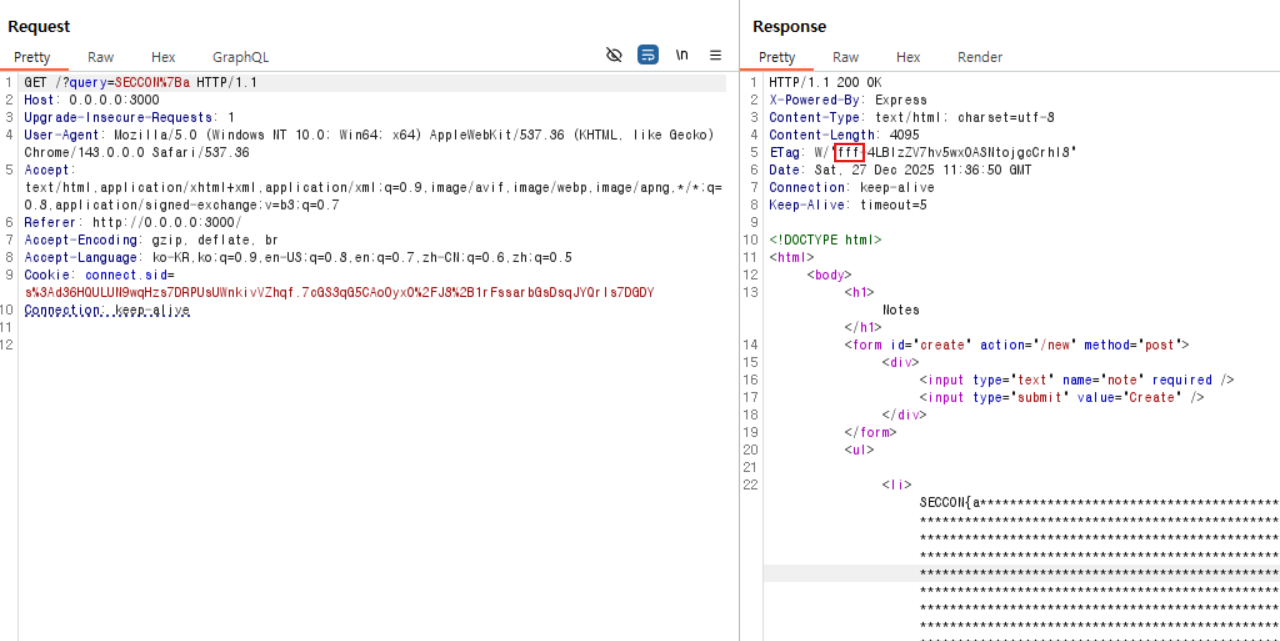
(1) When searching for a value that matches the FLAG:
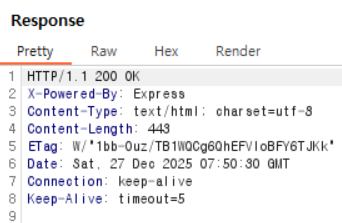
(2) When searching for a value that does not match the FLAG:
In case (1), the Content-Length is 484, and converting it to hexadecimal yields 1e4.
In case (2), the Content-Length is 443, and converting it to hexadecimal yields 1bb.
As shown above, you can confirm that the value before the - character in the ETag changes to the hexadecimal value corresponding to the Content-Length.
Now, suppose we use CSRF to fill the memo list so that the Content-Length becomes 4095—that is, so that the length corresponds to fff in hexadecimal. If, in this situation, an additional memo that contains the FLAG is included, the Content-Length will exceed 4095, and the stat.size portion of the ETag will become larger than fff. At that point, since stat.size becomes 0x1000 or greater, the ETag grows by one more character.
Each time a memo is added, around 25 extra characters are appended due to HTML tags like <li> and newline characters. Accounting for that overhead, you can add three memos of the maximum length (1024 characters each) and one additional memo of 480 characters to make the Content-Length exactly 4095.
1 | 1024(dummy text) + 25(HTML tag, blank) => 1049 |
Could we use this to construct a more pronounced (clearer) oracle?
Triggering a 431 Error via ETag Length
After receiving an ETag, the client includes that ETag value in the If-None-Match header when making the next request to the same URL.
Also, by default, Express enforces a limit on the maximum size of request headers.
https://github.com/nodejs/node/blob/v25.2.1/src/node_options.h#L159
1 | uint64_t max_http_header_size = 16 * 1024; |
If the request header size exceeds that limit, a 431 error is triggered.
Since the request headers can be influenced by the query value, if we supply a query string large enough to reach that threshold, then a 431 error will occur exactly when the ETag value grows by one byte (because the ETag is used in the If-None-Match header on the next request).
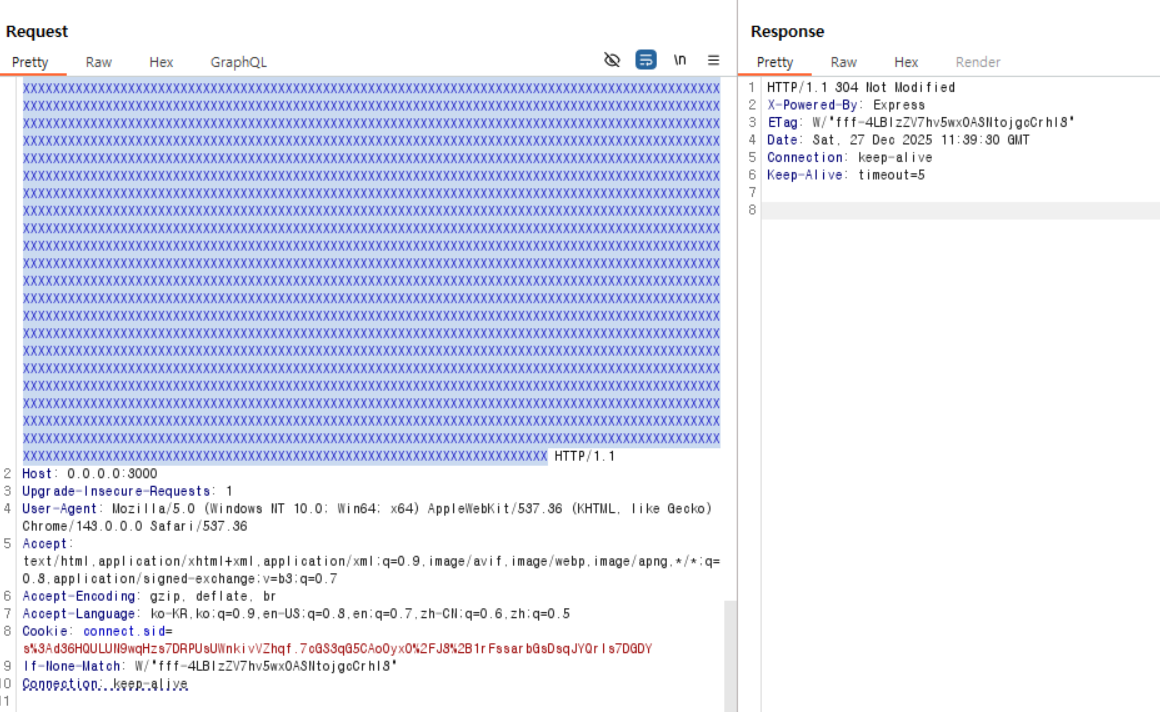
In a local environment, when sending a query of size 15,787 and searching for a non-FLAG value (304 response)
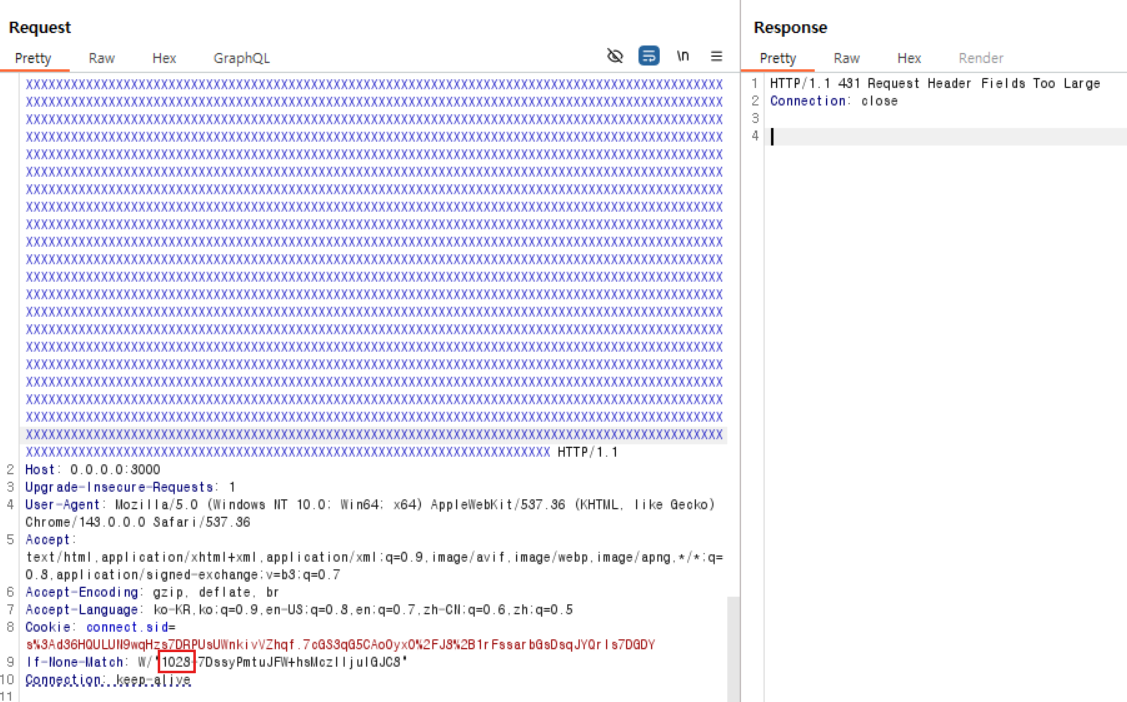
In a local environment, when sending a query of size 15,787 and searching for the FLAG value (413 response)
As shown in the Burp Suite packet above, when the request includes the FLAG, the length of the If-None-Match header increases by 1, which causes a 413 error to be triggered.
Detecting a 431 Response Status
Then, how can we tell whether we received a 431 response status?
Normally, in browsers, when a page navigation occurs, a new history entry is pushed, causing history.length += 1.
However, in Chromium, there are cases where the navigation results in a replace rather than a push, as shown below.
1 | blink::mojom::NavigationApiEntryRestoreReason reason = |
1 | common_params_->should_replace_current_entry = |
As shown above, should_replace_current_entry checks whether a navigation to the same URL is a failed navigation, and if it is, Chromium performs a replace instead of a push.
If, as in this challenge, the second request results in a 431 error, a replace occurs instead of a push. Therefore, across two navigations to the same URL, history.length increases by only 1.
In other words, the first request’s entry is replaced by the second request, so instead of increasing by 2 as it normally would, the history length increases by only 1.
Because history.length can be measured after navigating the window to about:blank, an attacker can check how much history.length increased to determine whether a 431 error occurred.
1 |
|
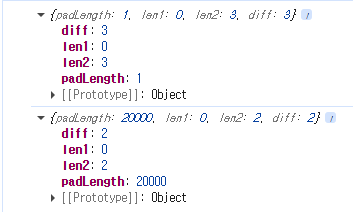
When padLength is large (triggering a 431 error), the history.length value is lower by 1.
Solver
The final exploit proceeds as follows:
- Use CSRF to fill the notes with dummy entries (for each candidate prefix) so that the
Content-Lengthbecomesfff. - Pad the URL to bring the request size just below the 431 error threshold.
- For each prefix, send the same request twice and measure
history.lengthto determine whether a 431 error occurred. - If the difference in
history.lengthis 2, treat that prefix as part of the FLAG. - Repeat steps 1–4 to recover the full FLAG.
Below is the PoC code provided by @Ark.
1 | <body> |
In this PoC, each time the main loop runs, it calls getThreshold() to compute—via binary search—the padLength threshold at which 431 errors begin to occur.
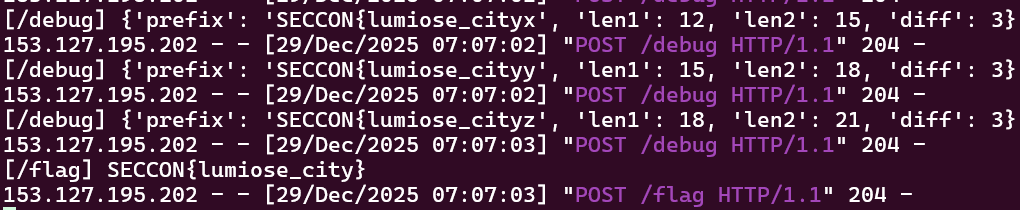
FLAG : SECCON{lumiose_city}
Unintended Solution
In addition to the ETag-Length XS-Leak technique described above, the challenge’s only solver, @parrot409, solved the problem by leveraging the cache eviction behavior of Chromium’s in-memory disk cache.
https://gist.github.com/parrot409/e3b546d3b76e9f9044d22456e4cc8622
XS Leaks using in memory disk cache grooming
In Incognito mode and in a Puppeteer bot environment, a browsing context created via createBrowsingContext uses an in-memory disk cache whose capacity is much smaller than the normal on-disk cache.
If that cache reaches its capacity, how does Chrome evict entries?
By default, cache eviction follows an LRU (Least Recently Used) policy, removing the entries that were cached least recently (i.e., the oldest ones) first.
1 | // Signals that an entry has been doomed, and so it should be removed from the |
By leveraging this property, we can determine whether the search query matched the FLAG.
When the query matches a substring of the FLAG, the resulting page is larger than when there is no match. As a result, a successful match consumes more cache capacity than a failed search.
Using this, the exploit flow is roughly as follows:
- Repeatedly request arbitrary pages to preload enough dummy cache entries, grooming the cache to sit near its capacity threshold.
- Visit the search page multiple times to test whether a specific character is contained in the FLAG (or whether a prefix match holds), so that the response-size difference between success and failure accumulates as a noticeable difference in total cache usage.
- Check whether the initial reference entry (the “sentinel” page) is still present in the cache, and infer whether the character is part of the FLAG based on whether it was evicted.
The in-memory disk cache capacity is specified in the code below.
https://chromium.googlesource.com/chromium/src/%2B/main/net/disk_cache/memory/mem_backend_impl.cc#27
https://chromium.googlesource.com/chromium/src/%2B/main/net/disk_cache/memory/mem_backend_impl.cc#75
1 | const int kDefaultInMemoryCacheSize = 10 * 1024 * 1024; |
By default, the cache size is set to 10MB, and if physical memory is available, it uses 2% of the total RAM (capped at 50MB).
Therefore, we can assume the maximum capacity of the in-memory disk cache is roughly 50MB, and groom the cache close to that threshold. However, trying to fill it to exactly 50MB can make the outcome unstable due to non-deterministic factors such as network latency, concurrency, cache metadata overhead, and eviction timing.
Instead, we first fill the cache to around 49MB to keep it just below the threshold, then add ~1KB-sized entries to fine-tune the boundary. Next, we repeatedly visit the search page to test whether a specific character is present (amplifying the cumulative cache-usage difference). Finally, we probe whether the initially inserted sentinel page is still cached—using a method like only-if-cached—and determine whether the character is part of the FLAG based on whether it was evicted.
Unintended Solver
@parrot409 performed the exploit steps outlined below.
- push 1 entry of size 1b
- push 49 entries of size 1mb
- push 599 entries of size 1kb
- push
//challenge.com/search?query=SECCON&iforifrom 0 to 200 with window.location - query the disk cache to see if the first entry we pushed is purged
The full PoC code is as follows.
1 | const express = require("express"); |
※ In the Fetch API, only-if-cached causes a request to fail if the resource you’re trying to load is not already cached.